

Today's clutch tutorial is loosely based on a Betsy Ross pattern I purchased years ago when I first started sewing. The pattern is not being made anymore but you can google and find it in various etsy shops. It is the perfect clutch pattern for a beginner. I've seen various finished versions here and there and have made the clutch several times in different fabrics. I struggled with a few details, such as feeling like I needed to match the fabric repeat from the folded top to the body of the clutch and having a hard time getting the point on the folded top perfectly pointy. I experimented with making the folded flap straight across rather than a pointed triangle, but the corners tended to flip up and, with certain fabrics, they appeared too bulky. If you've ever made fabric coasters you know how frustrating it is to make the corners square. No amount of clipping on the corner seam allowance eliminates the bulk once turned to the right side. I have finally developed a solution to those two problems and want to share it with you!

This is the result and I will now do my best to tell you how to make it!

We begin with 3 pieces of fabric. Thin fabrics work best for this bag because all of the seamed edges will need to be compressed and stitched along the sides, as you will see. Cut two 8" x 8" squares and one 8"wide x 10"tall rectangle. I used two of my Spoonflower test swatches, which is basically how I came up with the 8" x 8" measurement. This is a great way to use those test swatches if you have them! The two prints shown above will be the outside of the clutch while the coordinating gray rayon bengaline fabric will be the lining. Other options would be to use one 8" x 16" fabric for the outside but, if it's a print, you may feel the need to make the print repeat line up from clutch flap to clutch body and that's a bit of a challenge. Another option is to have one 8" x 8" square and one 8" x 18" rectangle which would become part of the outside and the lining. Finally, for the brave, you could use just one 8" x 26" rectangle, using that for both the inside lining and outside bottom of your clutch.

But I am using the three pieces, and believe me, it is just easier this way! So, take the two printed swatches and place them right sides together, on each 8" wide end of your lining fabric (see photo above). I like to pin it with the pins pointing towards where the machine needle will be sewing so that they are easy to pull out as the needle approaches. Sew a 1/4" seam.

Then, after you sew those two seams, pin the two unattached ends of your printed fabric together. Sew a 1/4" seam, removing pins as you go. Press all three seams open. You will have a continuous circle, or tube, of fabric.

You will need to flatten this circle, positioning the ends so that the fabric you choose to be on the folded flap of your clutch is folded down about 1 and 3/4" to where it meets the lining fabric.

One the opposite end, you should have about 3/4" from the seam to the folded edge of your other printed fabric square.

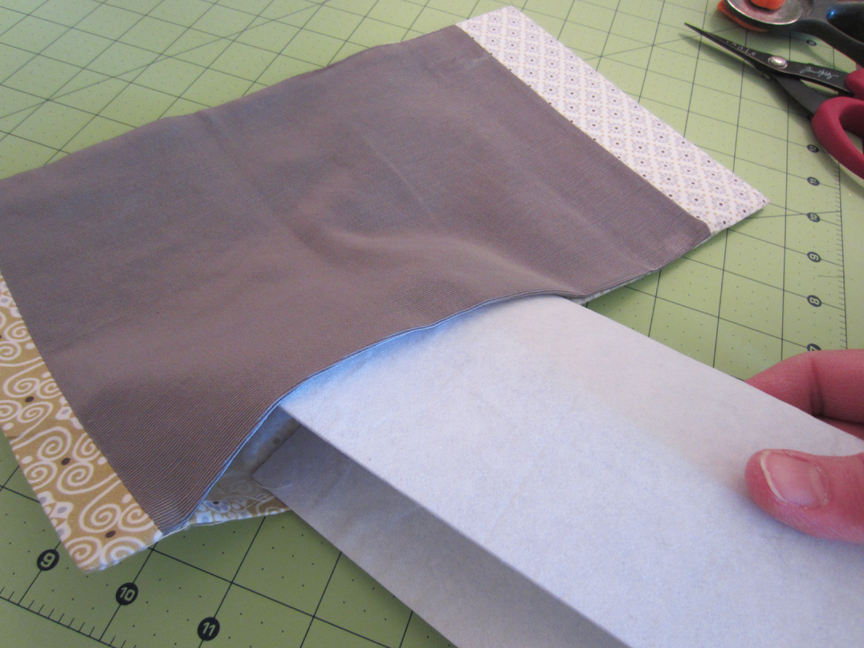
Now, make a 3/8"seam all along one long side of this flattened fabric circle. On the other side, start at each end and make a 3/8" seam that at least goes over and slightly past your previously sewn seams. This will be the gap for turning right-side out. As you see above, I have left about a 6" gap. The gap should be closer to the end with the 3/4" of outer fabric. There is no need to clip the corners because the seam allowance on those folded edges should flatten neatly once inside.

So, turn your clutch right-side out and press these side seams. Since they are hard to get to, I just go ahead and fold the fabric so the seams are on top. Don't worry about the fabric edges of the gap just yet. After the seams are pressed flat, you can then press out any unwanted creases you have created on the body of the bag.

Like so!

The Betsy Ross pattern calls for one large piece of sew-in interfacing to go inside of the clutch. I have found that in order for the squared-off folded flap closure of clutch to stay flat, it's best to cut two pieces. There will be a gap between the two on the inside of the bag which makes the fold, and therefore the flap, much flatter. Cut one 7" x 3" piece and one 7" x 8 1/2" piece.

First, insert the 7" x 3" piece and push it to meet the folded edge of what will be the folded flap. If the interfacing is too snug (this will depend on the thickness of your fabrics), trim just a tiny bit off one side until it fits comfortably. Push the inner seam allowances toward the back, or inside lining, side of the clutch. Then, top-stitch that folded edge as neatly as you possibly can. This will add a nice finishing touch to your clutch and also hold the interfacing securely in place.
You will need to fold the larger piece in order to get it though the gap. Just wrestle with it (and trim side of interfacing if needed) until it is in place with the lower edge firmly up against the lower 3/4" folded edge of your fabric. Once again, pull the inner seam allowances on to the side with the lining fabric. It just looks and feels nicer that way!

You can now begin to close the gap in the side seam by folding the outer printed fabric over the edge of the interfacing and then folding the edge of the lining to match. This takes just a little bit of fiddling to make it right. This will be sewn closed when you create the pocket of the bag, which is the very next step.

Now, pull up and fold over the lower part of your clutch. That would be the end with the inner 3/4" folded and top-stitched edge. Bring that end up about 4 1/4" to meet the upper edge of the interfacing, which you can feel through the fabric lining. This will be the opening to the pocket of your clutch. Press the folded edge with your hand to create a crease in the interfacing/fabric sandwich.

The top, which will be the folded closure, should easily fold down creating a 3" flap. The gap between interfacing pieces should be at the top.

Open the flap back up but keep the bottom of the clutch folded closed. On the inside of the bag, start at the top-stiched edge of the flap and sew about 1/8" from the side edge of the clutch all the way down to the folded bottom. Of course, lock your stitch on both ends and it's probably a good idea to back & forth stitch a few stitches where the opening to the pocket is because it will have to endure a lot of stress as you take your valuable possessions in and out.

On the outside of the bag, you will have stitches up both sides and across the flap's edge (we did that earlier!), 1/8" from the edge.

Now you just need to choose a decorative snap and, following the instructions on the package, install it centered on the front of the clutch. First put in the decorative part and use it to press down, creating a creased mark inside, centered right below the opening of the bag. Place the other half of the snap there and, according to directions, install there. I actually love putting in snaps! If you don't, you could also use velcro or figure out how to put a magnetic snap in. That takes some advanced planning which I have not worked out!

This is what the back of the clutch should look like, split in half by the two fabric prints.

You can see the position of the other half of the snap here.
As it turns out, this pocket clutch is the perfect size to hold your passport and/or cell phone. Of course, cash and credit cards will fit nicely too!
No comments:
Post a Comment